Planning a home renovation is exciting until reality sets in. There are rooms to prioritise, budgets to allocate among them, contractors to vet, materials to source, and timelines to meet. All of this at the same time. It’s almost like a daunting task!
Without a clear plan, even the most enthusiastic homeowner can find themselves overwhelmed before a single wall has been painted.
The Good News
Renovating on a budget is entirely possible, and doing it room by room is one of the most practical approaches. It keeps costs manageable, allows you to make decisions methodically, and means you can pause, reassess, and continue at a pace that suits your household, and most importantly, your finances.
This step-by-step guide walks you through the full planning process, from deciding where to begin to the moment you hand over the final payment to your contractor.
Step 1: Decide Which Rooms to Renovate and in What Order
Before you spend any money or make any decisions, sit down and take stock of every room in the house. Now, walk through each space and assess what it actually needs. Some rooms may require structural attention, whilst others simply need a cosmetic refresh. These are very different priorities and should be treated as such.
As a rule, always address functional or structural issues first. For instance, a leaking roof, a damp bathroom wall, or faulty wiring takes precedence over aesthetic upgrades, regardless of how appealing those upgrades may be. Once the essentials are taken care of, you can move on to the spaces that will have the greatest impact on how your home feels day by day. These are typically the living room, kitchen, and primary bedroom.
Renovating in a logical sequence also saves money. For example, completing all tile and flooring work across several rooms at once reduces labour costs, as tradespeople can complete related tasks in a single visit rather than returning multiple times.
Step 2: Set a Budget Per Room
A total renovation budget without room-by-room allocation is very difficult to manage. Assign a specific budget to each room before any work begins, and factor in a contingency of at least 10-15% per room to cover unexpected costs. Renovation projects almost always bring surprises once walls are opened or flooring removed.
When setting your per-room budget, consider the scope of work, the size of the space, and the materials you intend to use. A bathroom renovation will cost considerably more per square metre than repainting a bedroom, so your budget allocation should reflect that reality.
Keep your budget figures in writing and refer to them consistently throughout the project. Verbal agreements and mental notes are not sufficient when you are managing multiple rooms, multiple contractors, and multiple material purchases at the same time.
Step 3: Your Budget-Friendly Renovation Toolkit
Once your planning framework is in place, the following renovation moves offer the best return on investment for homeowners working within a budget. They are applicable across most rooms and can be scaled up or down, depending on what you are ready to spend.
Painting
This is the single most cost-effective renovation you can carry out. A fresh coat of paint transforms a tired room and costs a fraction of what any structural change would. When in doubt about colour, opt for neutral tones in warm or cool hues. Neutral colours work with every style and serve as an excellent backdrop for furniture and accessories.
Dado and picture rails
These features are grossly underestimated. They can dramatically change the character of a room if you use them to create defined borders between two wall colours or paint them in soft complementary tones. They add architectural interest without much expenditure.
Flooring
This is often the renovation that has the most visible impact. Engineered wood, laminate, bamboo, cork, and faux wood planks are all affordable options that can completely change the feel of a space. Changing the floor covering is frequently the most effective single investment a homeowner can make.
Lighting
This deserves far more attention than it typically receives in budget renovations. Cove lighting, for instance, when installed within a dropped ceiling, adds a layer of sophistication to living and dining spaces. The effect works in both modern and traditional interiors and has a timeless quality that does not date quickly.
A focal point
Creating one gives every room a sense of intention and design. Identify the wall you see first when entering the room and treat it as a feature wall. Simple. Three-dimensional wall panels, stucco finishes, bold wallpaper, or a carefully chosen paint technique all work well at varying price points.
Wall art
A distinct piece of wall art is one of the simplest ways to refresh a room. Flea markets, antique shops, and second-hand stores are excellent sources of affordable framed pieces. An art gallery arrangement across one wall can be highly effective and requires very little investment.
Interior accents
Room accents like lampshades, cushions, vases, and hardware upgrades are often overlooked but collectively make a significant difference. Changing door handles, light switch plates, and cabinet fittings across a room costs very little but contributes to a beautifully finished, cohesive look.
Window treatments
These complete a room in a way that few other elements can. New blinds, shades, or curtains, even simple no-sew drapes, can entirely change how a room feels. Never underestimate the finishing power of well-chosen window dressings.
Smart home features
They are increasingly accessible at budget-friendly prices. Smart lighting systems, programmable thermostats, and integrated security features can modernise an older interior whilst also adding practical value, particularly if you plan to sell in the future.
Step 4: Compare Contractors and Choose Your Materials Wisely
Don’t proceed with a contractor based on a single quote. Never. Obtain at least three quotes for every job and compare them, not just on price, but on timeline, materials included, payment terms, and reviews from previous clients. The cheapest quote is rarely the best choice if it comes with vague terms or an unrealistic timeline.
When reviewing quotes, ask each contractor to itemise their costs. Labour and materials should be listed separately so you can assess where the money is going and identify any areas where you might source materials yourself at a lower cost.
Material selection should always balance cost, durability, and aesthetics. Cheaper materials that require replacement within a few years are rarely the economic choice they appear to be at the outset. Where possible, visit suppliers in person before committing, because colours and textures rarely translate accurately in online photography.
Step 5: Build a Realistic Timeline
A renovation timeline that has not been thought through carefully is one of the most common causes of budget overruns. Delays cost money, particularly when they affect the sequence of work. A delayed tiler, for example, can hold up a painter, a cabinet installer, and a flooring contractor in turn.
Map out each room with a start date, an estimated completion date, and the key tasks within that room. Build in buffer time between rooms where possible, especially if you are living in the house during renovation. Have it in mind that contractors rarely finish exactly on schedule, and having flexibility in your plan reduces stress considerably.
Share your timeline with every contractor involved so that each party understands where their work sits within the broader picture. A shared timeline also makes it easier to hold contractors accountable if, and when, delays begin to affect other areas of the project.
How to Use the Room-by-Room Renovation Planner Tool
The Room-by-Room Renovation Planner Tool below is designed to hold your entire renovation plan in one place. Here is how to use it:
Open the Room Planner tab and add each room you intend to renovate, along with its assigned budget.
Move to the Contractor Comparison tab and enter the details for each contractor you are considering, including their quote, timeline, and any notes from your conversations with them.
Use the Materials Tracker tab to log every material or product you need to purchase, which room it is for, the supplier, and the cost.
Finally, use the Timeline tab to map out your renovation phases with start and end dates and a live status for each stage.
Work through these tabs as your project progresses and update each entry as decisions are made, quotes are confirmed, and work is completed.
On a final note, renovating on a tight budget does not mean
compromising on quality or style. It means planning carefully, making informed
decisions, and keeping your finances visible throughout the process. The
homeowners who come out of a renovation feeling great about the experience are
almost always the ones who planned it well before a single tradesperson
arrived.
Take it room by room. Track every decision. And give
yourself the structure that makes the whole project manageable.
You have found a designer you like. You have had a design consultation service. Now the quote arrives in your inbox, and you stare at it, wondering what half of it means. This is more common than you think. Interior design quotes can look complicated, but once you understand how they are put together, they will then make a lot of sense.
This guide walks you through what a quote usually contains, why designers charge the way they do, and what questions you should ask before you sign any contract.
Why Quotes Look Different from Designer to Designer
No two interior design quotes look the same. That is because designers are allowed to set their own fee structures. One designer might charge you by the hour while another might charge a flat fee for the whole project. A third might charge a percentage of whatever the total project costs, and some combine all three methods, employing one method each at different stages of a project.
This is not designers trying to confuse you. It reflects the fact that every project is different. A single room refresh is priced very differently from a full home renovation. Understanding which model your designer uses is the first thing to look for when a quote lands in front of you.
The Main Fee Structures You Will See
An hourly rate means the designer tracks every hour they spend on your project and bills you for it. This includes time spent on emails, phone calls, sourcing products, and site visits. Hourly rates vary widely depending on experience and location. The upside is transparency. The downside is that costs can creep up if the project takes longer than expected.
A flat fee is a single agreed price for a defined scope of work. The designer works out how long the project will take, factors in their costs, and gives you one number. This makes budgeting easier. The key thing to check is exactly what is included in that flat fee and what would trigger an additional charge.
A percentage of the project cost means the designer charges a percentage of whatever is spent on the project overall. If the project grows, the fee grows with it. This model is more common on larger renovation or commercial interior design projects.
A cost-plus model is one where the designer buys furniture and materials at a trade discount and charges you a marked-up price. The % markup covers their time and expertise in sourcing such products. You may not always see this spelt out clearly in a quote, so it is worth asking the designer what it implies, directly.
Other Charges That Might Appear in a Quote
Beyond the main design fee, a quote might include a retainer. This is an upfront payment that secures the designer's time before work begins. It is not an extra charge on top of everything else. It is usually deducted from the total fee on the successful completion of the project.
You may also see a line for a consultation fee if your initial meeting was chargeable. Some designers offer the first consultation free. Others charge for it from the start, particularly if they have spent a significant amount of time preparing for it.
Disbursements are another item that can appear. These are out-of-pocket costs the designer passes on to you, such as travel, printing, or postage. They are usually small, but they are worth knowing about.
Questions Worth Asking Before Signing the Agreement
Ask the designer to walk you through each line of the quote. A good designer will not mind doing this. Ask what is not included, because that is often where surprises come from later. Ask whether furniture and materials are included in the quoted figure or billed separately. Ask how changes to the project briefing are handled and whether they affect the fee.
If you are a student or emerging designer reading this, the same questions apply in reverse. When you write a quote for a client, be prepared to explain every line clearly. Clients who understand what they are paying for are far more likely to trust you and come back.
A Quote Is Just the Start of a Conversation, Not a Commitment
Getting a quote does not mean you are committed. It is an invitation to ask questions and make sure the working relationship is set up well from the start. Interior designers who communicate their fees clearly tend to be the ones who manage projects quite well, overall. Clarity at the quote stage is a good sign of how the rest of the project will go.
Take your time with it. Ask what you need to ask. Then decide.
For a deeper dive into all the fee structures interior designers use, including how markups, retainers, and percentage fees work in practice, see my book How Interior Designers Charge for Their Services, available on Amazon in paperback and e-book.
Are you thinking about upgrading your outdoor space? If yes, adding a water feature is one of the best home improvement projects you can take on to increase the value of your home.
Maybe you have a sprawling deck, a medium-sized backyard, a small garden, or a tiny balcony; there is always a water feature that will work for your space. You do not need that much space to enjoy the look and sound of moving water.
The first thing to do is stop thinking about water features in terms of size, as they come in all configurations and sizes. For instance, a large bowl, an old barrel, or even a repurposed bathtub can become a stunning water feature with a little creativity and basic DIY know-how.
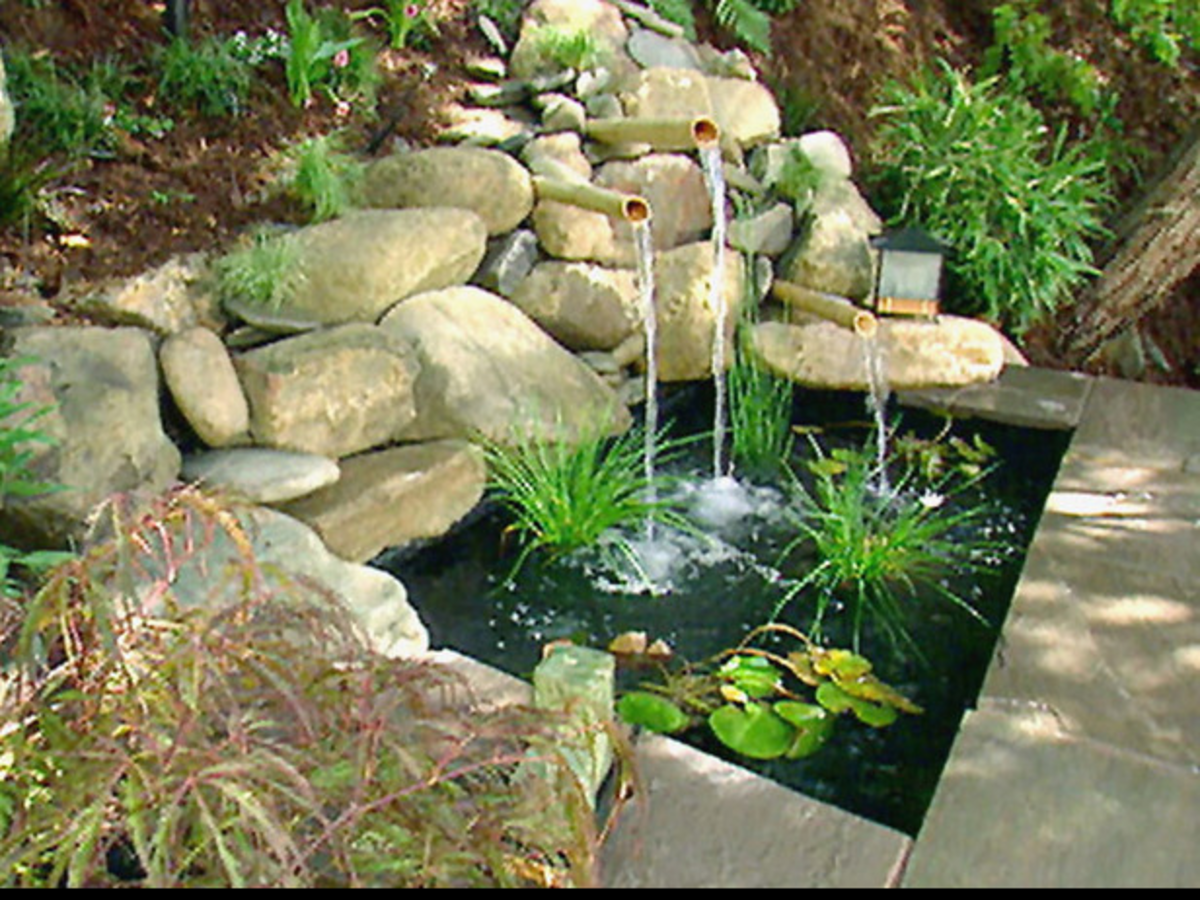
Natural setting - Patio water feature with a fountain emptying into a small pond.
Patio Ponds
A small patio pond is easy to create. You can use a large plastic or terracotta bowl to create a pool with cascading water.
For a bigger outdoor area, an old bathtub sunk into the ground will make an impressive pond when half-surrounded by flowering plants at ground level and some water lilies floating on the water. If creatively decorated with stone, pebbles, foliage, and some pretty fish, you will have a feature that looks like it cost a fortune.
Ponds have real home improvement value. They cool the surrounding air, create a calming atmosphere, and significantly boost the visual appeal of your outdoor space.
If you are already planning a patio renovation, it is worth building a pond into the design from the start.
*DIY tips for a ground-level pond:
Dig out an area of ground.
Fit in a discarded bathtub.
Fill it with water.
Plant low-growing flowers around the edges to soften the tub rim/border.
Add goldfish and aquatic plants to bring it to life.
For anything more complex, like a multi-level or filtered pond system, bring in a landscape designer.
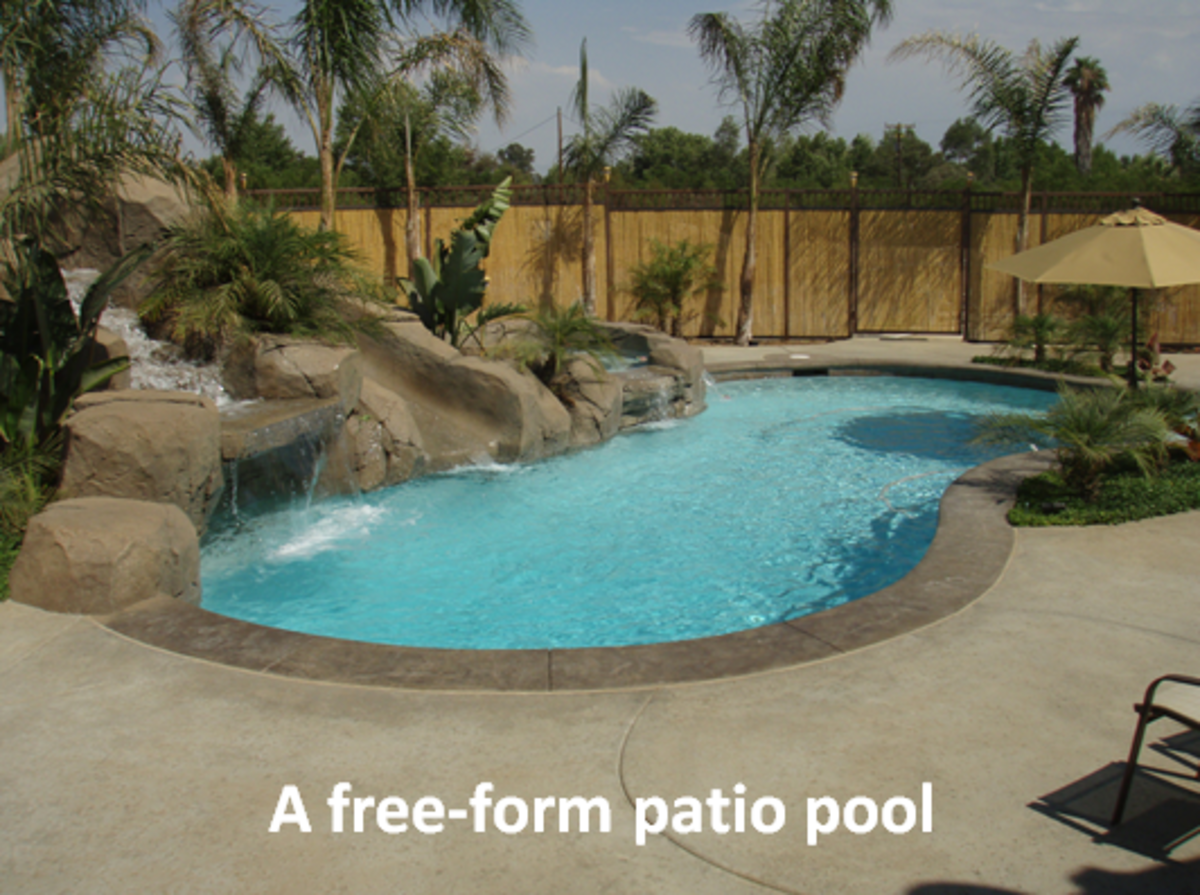
Small Garden Pools
A patio or garden pool is not the same as a swimming pool. Think of it as a decorative water garden that happens to be large enough to dip your feet into or even splash around in, if built big enough.
Small pools work in both formal and relaxed outdoor settings. They can sit at ground level or raised so you can perch on their edge. Fill them with oxygenating aquatic plants like floating hyacinth, tropical water lilies, or water grasses. Add koi or goldfish for movement and colour.
For something unique, skip the standard rectangular shape. An asymmetrical pool looks far more interesting and adds real character to the exterior.
*Tips:
If your garden is narrow, go vertical. A wall-fountain that drips water into a slim ground-level pond takes up almost no floor space.
For larger areas, you can build a still-water pool with stones or rock, then add water lilies and a few fish.
Brick and concrete are solid choices for a DIY build. They blend well with both traditional and contemporary outdoor styles.
For anything structural or complex, it is always best to call in a professional.
Home Fountains
A fountain is the easiest to build water feature, but the impact it
delivers is hard to beat.
The sound of sprouting water is great for masking street noise. It also creates a relaxing atmosphere and will easily become your garden’s focal point.
You can choose from three types that will work well for residential
properties.
Spray fountains. They push water upward through various heads, producing
everything from a fine mist to a tall column of water.
Splash fountains. These feature a centrepiece where water is pumped up
and cascades back down. These are often made by sculpting artists and can be
bought from garden and landscape supply stores.
Spill fountains send a single stream of water from a spout into a basin
or through a series of tiered troughs.
They are made from different materials like resin, stone, fibreglass,
ceramic, stainless steel, brass, and copper.
You will always find a style to suit any aesthetic.
*Tips for a simple DIY fountain:
Find a large unused barrel or a big clay pot and install it with a spray
spout. The plumbing work needed is minimal, the result looks great, and it
works perfectly for a compact patio.
Place smooth rocks at the bottom of the barrel to absorb the impact of
the falling water and reduce splashing onto the surrounding floor.
Once your pump is running, leave it on to flow continuously. Switching
it on and off repeatedly will shorten the pump’s lifespan.
Concluding...
Adding a water feature to your outdoor space is actually a home
improvement-type project. It will deliver results beyond the effort it'll take
you to plan and build. Once completed, its visual impact is immediate because
water is powerful. It draws the eye to itself, anchors space into the
surroundings, and gives even a small, basic patio a finished, intentional look.
But the benefits go further than beautifying your exterior. Water
features also:
Improve the aesthetics of any space, indoors or outdoors.
Provides a calming effect with the sound of moving water.
Makes your patio or garden a place you genuinely want to spend time in.
Does a practical job by masking traffic noise, loud conversations from
the neighbours, and other urban sounds that can make your space feel less
private than it should.
From a home improvement perspective, a well-designed water feature:
Signals that the outdoor space has been intentionally designed rather
than built as an afterthought.
So, whether you plan to sell your home eventually or just want to enjoy
where you live, that is worth investing in.
The good news is that you don’t need a large budget or a professional
contractor to get started.
A barrel fountain or a simple bowl pond can be completed over a weekend,
using basic tools and a modest budget. From there on, you can scale up if your
confidence and budget allow for it. Move from a small container pond to a
raised brick pool, or from a small spray fountain to a full wall-mounted
water-spill feature.
Whatever you decide to do, start with the space you have, no matter how
small it is. Choose a feature that suits your skill level, then build from
there.
Water has a way of transforming outdoor spaces. Almost nothing else can
match that.
One of the most common questions people ask before hiring an interior designer is how much it will cost. The honest answer is that it depends not just on the size of the project, but on how the designer chooses to charge. Understanding the difference can save you from budget surprises and help you ask the right questions before you sign any contract.
There Is No Standard Interior Design Fee
Interior designers are not like plumbers or electricians with a fixed call-out rate. They set their own fee structures based on their experience, the type of work they do, and the complexity of each design project. This means two designers WHO give a quote on the same job can present very different pricing proposals, even if the result would be similar.
The most common structures you will come across are:
Hourly rates
Flat fees
Cost-plus pricing
Percentage-based fees
While some designers use one method consistently, others combine methods that will depend on the stage of the project.
What Each Charging Structure Means in Simple Terms
The hourly rate is straightforward. You pay for the designer's time.
A flat fee gives you one agreed price for a defined scope of work.
Cost-plus means the designer sources furniture and materials at a trade discount and charges you a marked-up price.
A percentage fee is calculated as a proportion of the total project cost.
Each structure has both advantages and drawbacks, depending on your type of project and the available budget. The key is knowing which one applies to your quote before implementation work begins.
This Is Just the Starting Point
There is a lot more to understand about how designers structure their fees, like what retainers mean, how markups work, and how to protect yourself, as a client, or price your services confidently as a designer.
If you want the full picture, my book How Interior Designers Charge for Their Services covers every billing structure in detail, with guidance for both clients and interior design professionals. It is available in paperback and as an e-book on Amazon.