
A DIY installation of floating hardwood floors is not that difficult or challenging, as long as you read and stick to the flooring manufacturer's manuals and instructions.
The first thing to note is that different types of wooden floors require different systems of installation, and these explicit details can be found in the mentioned manuals.
In any D.I.Y. project, it is imperative that the step-by-step instructions be read and assimilated carefully so as to ensure a well-laid and beautiful floating hardwood floor finish.
Preparation of the subfloor that will receive the hardwood floor strips is crucial and can make the whole DIY task successful or turn out a failure.
As the wood strips are not being attached to the subfloor, floating hardwood floors can be installed over almost any kind of floor base.
Preparations
To prepare for the installation of floating hardwood floors, the following must be done:
- The subfloor must be very clean and dust-free.
- The floor must be very even, without any humps, bumps, or crevices.
- Deciding on the direction in which to lay the floating hardwood floor.
- Make sure that the space between the finished hardwood floor and the subfloor is no more than three-quarters of an inch (18mm).
- Gathering the tools required to complete the D.I.Y. flooring job.
Tools Required to Install Hardwood Floors
To install floating hardwood floors, the general tools required are:
- Woodworkers glue
- Spacers
- A hand saw, or a jigsaw
- A ruler
- Straps
- A hammer
- Chalk
- A tapping block
- Pull tool
Installers will need to check the manufacturer's detailed instructions to know if any additional tools are required. All these tools can be bought at any home improvement, D.I.Y. stores or online at eBay.
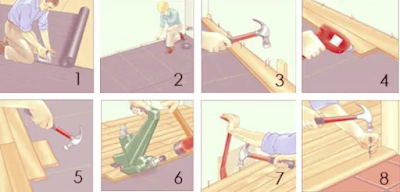
Installation Process
First, test the floor to see if it’s even and level. This can be done by laying a plank of wood at the edge of the floor.
If there is any space between the wood and the sub-floor that's more than 3/4 of an inch (18mm), spread some self-levelling joint compound on the floor.
When the compound dries, your sub-floor should be adequately level, and you are ready to proceed.
The most important rows while installing floating hardwood floor planks are the first 3 or 4 rows. If these rows are not straight from the start, you may as well know that as you proceed along, the lines become less and less straight, and the installed planks will start to open up as you tap the next planks into position.
The planks should be straight, and all the joints should fit snugly, using clamps and straps to keep all the connections tight.
Now, start to attach the floating flooring planks by using an adhesive between the joints of the wood planks. To apply the glue, run a bead of glue along the joint of the wood, and then snap that piece into the first piece you've already set down.
The glue dries in roughly ten minutes, so you want to be clear on the placement of the wood before applying glue along the joints. Be careful, and do not use excessive glue.
During the installation of floating hardwood floors, it is a great idea to measure at least 2 times, so you don’t end up with too many off-cuts or pieces that will become useless scraps of hardwood.
While inserting each plank, fit the pieces together using a hammer, and tap them gently with a tapping block. Knock very gently to close the gaps. It's better to knock often, but softly, than it is to knock a few times with force. There shouldn't be any gaps between planks while installing floating hardwood floors.
Always drive in the joint directions that you are trying to close because once the pieces are set and dry, it will be virtually impossible to adjust the joints.
Effects of Weather on Floating Floors
As you lay them along, you must leave a bit of space around the perimeter of the room to allow for contraction and expansion that occurs occasionally during weather changes, because wood changes with time and temperature.
Towards the end of your floating hardwood floor installation task, the space left will need you to pull the iron and the hammer to draw the planks together. For larger areas, it is suggested to allow as much expansion area as possible.
After completing the installation of floating hardwood floors, you must fit in your base mouldings or skirting, transitions and trims to cover the spaces left at the edges for expansion. Then leave the floor to set as advised in the manufacturer’s instructions.
(Article originally published by the author at Hubpages.com on 07/27/09)
Articles of interest
No comments:
Post a Comment
Note: Only a member of this blog may post a comment.